KSnow: Load continuous data into Snowflake using Snowpipe
To Nha Notes | Feb. 1, 2023, 11:51 a.m.
In this blog, we will discuss loading streaming data into Snowflake table using Snowpipe. But before that, if you haven’t read the previous part of this blog i.e., Loading Bulk Data into Snowflake then I would suggest you go through it. As now we have been set so let’s get started and see what Snowpipe is all about.
Introduction
Snowpipe is a mechanism provided by Snowflake to load high frequency or streaming data. Snowpipe provides us with the capability to load the data as soon as it becomes available in a defined stage. Therefore, achieving a near real-time or micro-batch load of data.
Use cases of steaming or near real-time data may be transactions arriving from core banking systems or event generated by IoT devices.
Snowpipe uses serverless architecture, so when you define a new Snowpipe it will not use our virtual warehouse resource. But, it will use its own resources, scaling up and down will be managed by Snowflake itself.
Snowpipe definition contains a COPY command through which Snowflake knows what data to load and which target table to load it to. We can say that Snowpipe is a wrapper around the COPY command.
Snowpipe loads data in response to new file notification events. These notification events are usually configured in cloud platforms. Or we can trigger a Snowpipe manually through custom programs calling the REST APIs.
Loading Data via Snowpipe
There are 4 high level steps in loading streaming data using Snowpipe:
1. Stage the Data: We would need to define a stage which could be a S3 bucket or Azure Blob where our streaming data will continuously arrive.
Note: As of date, Snowpipe doesn’t supports loading continuous data from Google Cloud Bucket.
2. Test the COPY command: Next step would be to create a target table and test our COPY command on sample data. We need to make sure that our COPY command runs successfully and correctly before we use it in our Snowpipe definition.
3. Create the Pipe: We will create a Pipe and we will provide the COPY command (that we have created for testing) in the Pipe definition. Here we are defining a Pipe and letting Snowflake know that when the Pipe executes it will load the data using the specified COPY command.
4. Configure Cloud Event: There are two ways to trigger the Pipe to load the data on a continuous basis.
i. Configure event through Cloud platform: This would trigger the Pipe whenever a new file arrives. When the event is triggered it will also trigger the associated Pipe which will then load the data into the target table. This is a preferable option since it requires less effort and is more robust compared to the alternate.
ii. Trigger the Snowpipe using REST APIs: We would write a custom program which we can execute whenever we want Snowpipe to perform the load.
The Process
a. We will have files arriving at an External Staging area like Amazon S3 or Azure Blob Storage.
b. We define a Snowpipe so that it will load files from the stage into the target Snowflake table.
c. Option 1: In order to trigger the Pipe, we make use of Cloud Notification Services (specific to the Cloud platform we are using)
Option 2: The trigger would be through a custom program invoking the REST APIs.
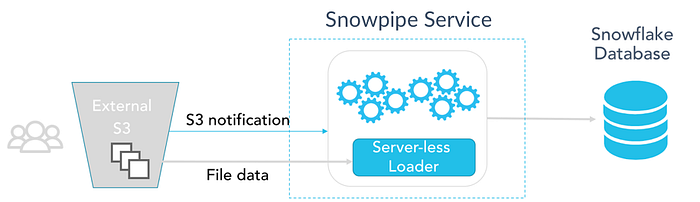
Fig: Trigger Snowpipe through Cloud Notification Service (Overview)

Fig: Trigger Snowpipe through Cloud Notification Service (Detailed)
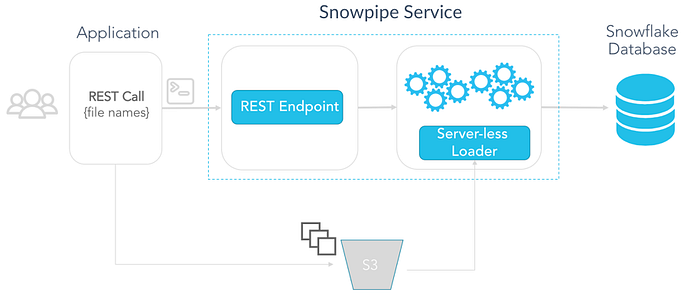
Fig: Trigger Snowpipe through REST API
Let’s look into the code (Assuming you are working with AWS)
CREATE DATABASE Transaction_DB;

USE DATABASE Transaction_DB;

CREATE SCHEMA file_formats;

CREATE SCHEMA external_stages;

CREATE SCHEMA snowpipes;

-- AWS S3 Configuration (ACCOUNTADMIN has the privilege)
CREATE OR REPLACE STORAGE INTEGRATION s3_int
TYPE = EXTERNAL_STAGE
STORAGE_PROVIDER = S3
ENABLED = TRUE
STORAGE_AWS_ROLE_ARN = 'arn:aws:iam::111222333444:role/snowflake_role'
STORAGE_ALLOWED_LOCATIONS = ('s3://snowflake-private/knoldus/load_data/');

-- create a file format describing the continuous data files
CREATE OR REPLACE FILE FORMAT file_formats.snowpipe_csv_format
TYPE = CSV FIELD_DELIMITER = '|' SKIP_HEADER = 1 NULL_IF = ('NULL', 'null') EMPTY_FIELD_AS_NULL = TRUE;

-- create an external stage using an S3 bucket
CREATE OR REPLACE STAGE external_stages.transaction_events STORAGE_INTEGRATION = s3_int
URL ='s3://snowflake-private/knoldus/load_data/'
FILE_FORMAT = file_formats.snowpipe_csv_format;

-- list the files already present in the bucket
LIST @external_stages.transaction_events;

CREATE TRANSIENT TABLE public.transactionDetails (
   Transaction_Date DATE,
   Customer_ID NUMBER,
   Transaction_ID NUMBER,
   Amount NUMBER
);

DESC TABLE public.transactionDetails;
Testing the COPY command on sample data.
-- test COPY command
COPY INTO public.transactionDetails FROM @external_stages.transaction_events FILE_FORMAT = file_formats.snowpipe_csv_format
ON_ERROR = 'CONTINUE';

-- check for data in the table
SELECT COUNT(*) FROM public.transactionDetails;

TRUNCATE TABLE public.transactionDetails;
Create/Define the Snowpipe
-- create the pipe
CREATE OR REPLACE PIPE snowpipes.transaction_pipe
AUTO_INGEST = true
AS
COPY INTO public.transactionDetails FROM @external_stages.transaction_events
FILE_FORMAT = file_formats.snowpipe_csv_format
ON_ERROR = 'CONTINUE';

SELECT COUNT(*) FROM public.transactionDetails;

SHOW PIPES;
Note:
Here, the Pipe definition is created, this will not result in automatically loading of any data into the target table until an event has been defined in the cloud storage.
Thus, if you run SELECT COUNT(*) FROM public.transactionDetails; this will result in 0 (zero) rows.
Run the command SHOW PIPES; to the get ARN for the Notification Channel of the Pipe that we need to use and copy the ARN.
Set up S3 event notification:
Go to the Bucket > Click on Properties > Clink on Events > Add notification
Configure the event notification as per need and finally select SQS Queue as the Notification Destination. Finally, add the ARN that we have copied by running the SHOW PIPES; command. And click on Save button.
You can learn about SQS from my blog Getting Started with Amazon SQS.
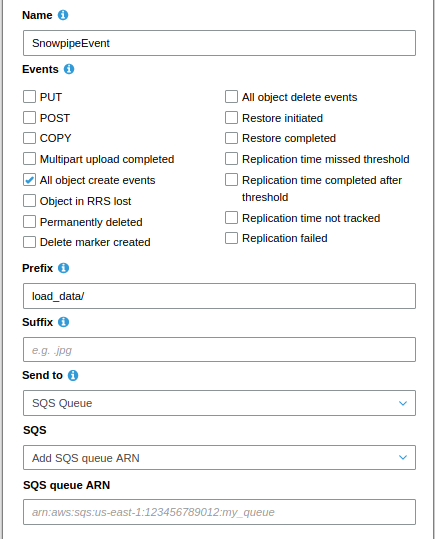
Fig: Configuration of Notification Service
Finally, you can load a new file in your specified path in the S3 bucket and the data will get loaded into the Snowflake table. (This takes few seconds to load)
You can validate by checking the row count of the table.
--After loading new data to S3

SELECT COUNT(*) FROM public.transactionDetails;

TRUNCATE TABLE public.transactionDetails;
10 best practices
- Consider auto-ingest Snowpipe for continuous loading. See above for cases where it may be better to use COPY or the REST API.
- Consider auto-ingest Snowpipe for initial loading as well. It may be best to use a combination of both COPY and Snowpipe to get your initial data in.
- Use file sizes above 10 MB and preferably in the range of 100 MB to 250 MB; however, Snowflake can support any size file. Keeping files below a few GB is better to simplify error handling and avoid wasted work. This is not a hard limit and you can always use our error handling capabilities such as ON_ERROR = CONTINUE.
- Keep max field size capped at 16 MB. Ingestion is bound by a Snowflake-wide field size limit of 16 MB.
- Keep your data ingestion process simple by utilizing our native features to ingest your data as is, without splitting, merging, or converting files. Snowflake supports ingesting many different data formats and compression methods at any file volume. Features such as schema detection and schema evolution (currently in private preview) can help simplify data loading directly into structured tables.
- Average measurements across customers are not likely to predict latency and cost. Measuring for a sample of your data is a much more reliable approach beyond the indicative numbers.
- Do check file loading success/failure for Snowpipe using COPY_HISTORY or other options, such as subscribing to Snowpipe error notifications. Also occasionally check SYSTEM$PIPE_STATUS for the health of the Snowpipe.
- Do not expect in-order loading with Snowpipe. Files are loaded concurrently and asynchronously in multiple chunks, so reordering is possible. If an order is essential, use event timestamp in data if possible, or use COPY and load sequentially.
- Leverage your existing object path partitioning for COPY when possible. Using the most explicit path allows COPY to efficiently list and load your data as quickly as possible. Even though Snowflake can scalably list and load large volumes of data; you can avoid wasted compute and API calls by using path partitioning, especially when you already loaded the previous days, months, and years data which will just be ignored for deduplication.
- Use cloud provider event filtering to reduce the amount of notification noise, ingestion latency, and costs from unwanted notifications with filtering on prefix or suffix events before it is sent to Snowpipe. Leverage the native cloud event filtering before using Snowpipe’s more powerful regex pattern filtering.
Snowflake provides the following features to enable continuous data pipelines:
- Continuous data loading -
Options for continuous data loading include the following:- Snowpipe - Snowpipe continuously loads micro-batches of data from an external stage location
Snowflake Connector for Kafka - The Kafka connector continuously loads records from one or more Apache Kafka topics into an internal (Snowflake) stage and then into a staging table using SnowpipeThird-party data integration tools
- Change data tracking - A stream object records the delta of change data capture (CDC) information for a table (such as a staging table), including inserts and other data manipulation language (DML) changes.
- Recurring tasks - A task object defines a recurring schedule for executing a SQL statement, including statements that call stored procedures.
Dataflow : SnowPipe->Stream->Task
The following diagram illustrates a common continuous data pipeline flow using Snowflake functionality:
Usage Notes
https://docs.snowflake.com/en/sql-reference/sql/create-task.html#usage-notes
-
Multiple tasks that consume change data from a single table stream retrieve different deltas. When a task consumes the change data in a stream using a DML statement, the stream advances the offset. The change data is no longer available for the next task to consume. Currently, we recommend that only a single task consumes the change data from a stream. Multiple streams can be created for the same table and consumed by different tasks.
Test step by step
https://medium.com/@knoldus/ksnow-load-continuous-data-into-snowflake-using-snowpipe-a386e2f62b4b => OK (not use stream)
https://docs.snowflake.com/en/user-guide/data-load-snowpipe-auto-s3.html => OK
https://selectfrom.dev/snowflake-stream-and-task-use-case-8f0fbed95d39 => OK (steam + task)
https://docs.snowflake.com/en/user-guide/data-pipelines-examples.html => OK (1 raw table + multi-streams + multi-destination-tables)
https://github.com/kromozome2003/Snowflake-Json-DataPipeline
References
https://medium.com/@knoldus/ksnow-load-continuous-data-into-snowflake-using-snowpipe-a386e2f62b4b
https://blog.knoldus.com/loading-json-data-into-snowflake/
https://docs.snowflake.com/en/user-guide/data-load-snowpipe-auto-s3.html
https://www.youtube.com/watch?v=VF0tfZGPASo
https://github.com/kromozome2003/Snowflake-Json-DataPipeline
https://docs.snowflake.net/manuals/user-guide/data-pipelines-intro.html
https://www.snowflake.com/blog/best-practices-for-data-ingestion/
https://www.analytics.today/blog/top-14-snowflake-data-engineering-best-practices
https://medium.com/snowflake/invoking-the-snowpipe-rest-api-from-postman-141070a55337
http://toppertips.com/stream-and-task-snowflake-jump-start
https://docs.snowflake.com/en/user-guide/data-load-snowpipe-errors-sns.html